Wednesday, October 27, 2010

Coconut Rice (Nucchi/ Kanee Phanna)


Coconut Rice is a very simple, coconut-rich recipe enjoyed by all in my family. Its a one pot meal and serves any meal plan and menu. In India, the rice which you get at local Kirana stores are anything ranging from long grain, short grain to short broken ones. This recipe calls for the use of the broken variety of rice (Kanee in Konkani). Mom painstakingly separated them with a Siever or Sifter (Channi) when we were kids to make this dish for us. Surprisingly, now you get them at local groceries in India as well and can be bought in bulk. This broken rice is known as Kanee in Konkani. I can't find broken rice here in Indian stores so used my stash of Sona Masoori rice for this recipe. Growing up, this was my favorite breakfast item. Its also a very portable food item for work, school or outdoor picnics.


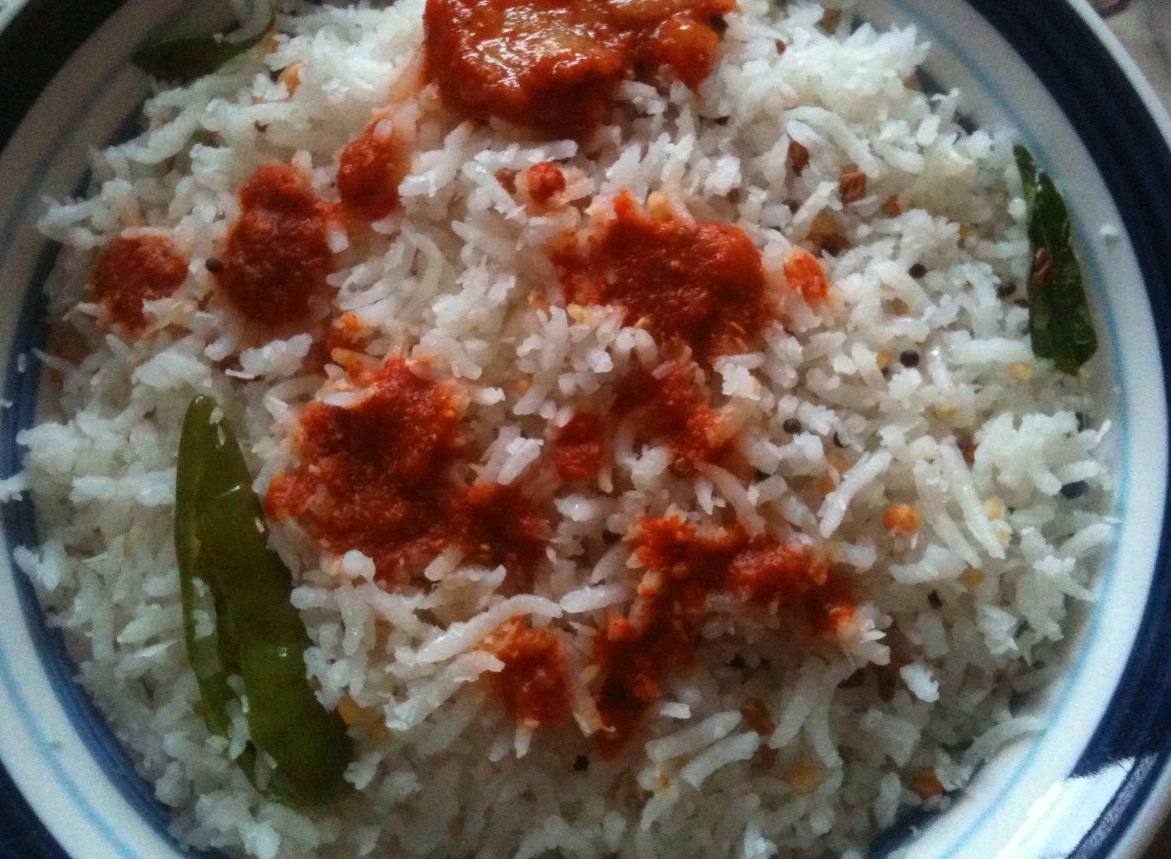
This dish is popularly known as Nucchi or Kanee Phanna in GSB Konkani and Nucchi in Kannada. There are also variations in practice with respect to the seasoning and the variety of rice used. One can also add Peanuts (Kadale) for extra crunch, Chana Dal for enhanced texture. The entire seasoning is done with Coconut oil in the original recipe. Fenugreek seeds, the innocuous element in this recipe renders a unique aroma to the fluffy rice grains and is also soothing on the tummy. I prefer having a warm bowl of this seasoned rice with Raw Mango Pickle liqueur and a drizzle of warm Coconut oil.
~  Nucchi ~
Preparation time: 5 minutes
Cooking time: 20-30 minutes
Yield: 2 servings
Ingredients:
Broken Rice or any available variety - 1/2 cup
Grated coconut (fresh or frozen) - 1/4 cup
Peanuts (optional) - 2 tablespoon

For Seasoning -
Mustard seeds - 1/2 teaspoon
Curry leaves - 2-4
Fenugreek seeds (Methi) - 1/4 teaspoon
Urad Dal (split) - 1/2 teaspoon
Coconut oil
Green Chilli (split lengthwise) -2
Hot water - 1/4 less than 1 cup
Salt

Method:
In a deep dish non-sick pan, heat coconut oil. Once the oil is sizzling hot, temper with a seasoning of mustard seeds and curry leaves. Add split urad dal, green chilli and peanuts. Saute on low flame. Add rice (pre-washed and rinsed) now and less than double the quantity of hot water [rice:water - 1: 1 and 1/2 proportion]. Add enough salt. Mix gently and bring to boil. Simmer on low flame for 20-25 minutes or till the rice gets cooked completely. Turn off flame and fluff it with a fork. Leave aside undisturbed for 5 minutes. Then, garnish with fresh coconut. Serve warm with pickle liqueur and a drizzle of coconut oil.

Monday, October 25, 2010

Yard Long Beans Side Dish - 2.0 (Alsande Upkari/ Waal Bhaaji)

Fresh crisp winter vegetables are hitting the local scene. A huge bunch of Yard Long Beans caught my fancy. They are known as Waal in Marathi/ Konkani and Alsande in GSB Konkani. I had made similar Upkari some time back. This time around, I changed the seasoning and the cutting style. The tender beans can be just chopped with hands, you just got to 'snap them off by an inch'. I learnt this interesting technique from Mom. She insists that tender beans be chopped in this fashion. That way they do not disintegrate after cooking and remain intact in shape and form. She also uses a seasoning of Byadgi Red Chillies instead of Green Chillies. I am documenting this for my future reference although its a very simple recipe.
~ Yard Long Beans Side Dish - 2.0 ~

Preparation time: 5 minutes
Cooking time: 15 minutes

Ingredients:
Yard Long Beans (chopped in 1" pieces) - 3 cups
Coconut powder or grated coconut (fresh or frozen) - 1/3 cup
Salt
Oil/Ghee

For Seasoning -
Mustard seeds - 1/2 teaspoon
Curry leaves - 2-4 leaves
Red Chillies (Byadgi) - 1-2

Method:
Wash the slender beans with lot of water. Pat dry. Snap them off with your hands to break them off into 1" pieces. Since they are tender they break off easily. Keep aside. In a deep vessel, heat few spoons of oil/ghee, temper with mustard seeds and curry leaves. Finally split each Red Chilli into two and add to the seasoning. Give a gentle stir. Add the chopped beans now and stir for couple of minutes. Immerse in water completely. Adjust salt as per taste. Bring to boil. Cover with a lid and simmer on low flame for 15-20 minutes or till the beans are completely cooked & the water evaporates. Garnish with Coconut powder and serve hot as a Side dish.

Wednesday, October 20, 2010

Kundapur Chicken Curry (Kori Rotti)


Kundapur is tiny city perched in the tranquil harmony of a beautiful seashore strip, swaying coconut palms and plenty of greenery, flora and fauna. Its located in Udupi district of Karnataka State, India. Kundapur is known for places of historic significance which includes scenic beaches, ancient temples with splendid architecture and best of all a cuisine which needs no further mention. If you ask any meat eating individual from Mangalore, they would proudly speak for hours together boasting about the few distinct & famous dishes which are part of Kundapur cuisine - Kundapur Chicken Curry, Chicken Ghee Roast, Kane Fry and Ghee Rice. Some also address the dish combination as Kori Rotti; Kori is Chicken and Rotti is the flaky bread eaten with this Chicken gravy.

Kundapur Chicken Curry is the fiery hot, spicy curry loved and adored by many. This humble red hued spicy curry with lot of broth and Ghee Rice get along like house on fire. It is an act of blasphemy to visit Kundapur and not partake in any of the sinfully rich dishes. The popular eating spot in Kundapur is Shetty's Lunch Home which is most sought after place when it comes to these dishes. If it is to be believed, Chicken Ghee Roast & Ghee Rice were all born in the cosy confines of this famous eatery.


I was wondering what makes this dish so special until I got a chance to sample this unique style of cooking Chicken one day at one of our dear one's place. I got the recipe and lot of tips and suggestions on getting the right flavour. Some of my friends informed me that Chicken and the broth are key components which define the flavour and taste of this dish. My MIL also makes the best Kundapur Chicken Curry and her other Non-Veg curries are simply amazing. Some of my friends opined that Farm Chicken (Naati Koli) gives best results. The broth is made by a fiery paste of Onions and Tomatoes seasoned with lots of Curry leaves resulting in a rich red colored paste known as Kundapur Chicken Masala. One could also use ready store bought spice powder of Kundapur Chicken Masala. Infact, some of my aunts and cousins opine that the store bought spice powder easily beats the one we make at home. Curry leaves offer a very nice balance and earthy flavour to this curry. Traditionally, its eaten with Ghee Rice, Kori Rotti, Idli (Khotte) or Rice String Hoppers (Shevai). I do not claim that this is the original recipe. This is my interpretation of this recipe and we both liked the flavour.


Preparation time: 15 minutes
Cooking time: 30-45 minutes

Ingredients:
Chicken (Thigh - Skinless variety) - 1 pound or 1/2 kg.
Onion (chopped) - 2 cups
Tomatoes (chopped) - 1 cup
Ginger paste - 1 tablespoon
Garlic paste - 1 tablespoon
Butter - 1/2 cup
Bay leaf - 1
Curry leaves - 10-15
Coconut milk (thick) - 2 cups

Kundapur Chicken Masala -
Red Chillies (Byadgi) - 8-10
Turmeric powder - 1/2 teaspoon
Cumin seeds - 1/2 teaspoon
Coriander seeds - 2 teaspoon
Cloves - 2-4
Cinnamon stick - 1" piece
Fenugreek seeds - 1/3 teaspoon
Toast the Red Chillies and grind them all to a paste with less or little water.

Yield - Around 2-3 tablespoon of spice powder

Method:
Heat a teaspoon of oil in a pan, roast the red chillies and spices for 2 minutes and allow to cool. Grind all of this along with Turmeric powder to a smooth red paste. This is Kundapur Chicken Masala. Wash Chicken thoroughly, defrost if required, wash multiple times till water is clear; pat it dry and chop them into bite sized pieces.
Puree Onion and Tomato separately and keep the paste ready. In a deep stock pot, heat the entire quantity of butter, allow to melt. Add Bay leaves and Curry leaves and saute for a minute or two. Add Ginger and Garlic paste and saute to eliminate the raw flavour. The fragrance and aroma now gets imparted to the oil. Add Onion paste and Tomato paste and sweat them in oil till the raw flavour disappears. Add the Chicken pieces now and gently give a stir. Cook for few minutes. All the Masala paste now, add enough water and bring to boil. Cover with a lid and simmer on low flame for 20-30 minutes till the Chicken is cooked. Once done, add thick Coconut milk and allow to simmer on low flame. Do not cook a lot after adding coconut milk. Turn off flame and serve hot. Suggested serving with Kori Rotti, Rice String Hoppers (Shevai), Idli (Khotte) or Ghee Rice.

Note - Do not use white meat of chicken (breast portions) since it remains hard after cooking. Best portions would be red meat - thigh or leg portions. They soften upon cooking and are apt for this curry. I made a big batch, lessen the proportion for smaller quantity.

Tuesday, October 19, 2010

Ginger Powder (Sonth Pudi/ Sonthi Pitti)


I have an ongoing fascination for Herbs, Spices and Spice powders. To withstand the long and chilly tormenting winters in US I had bought a pack of dry Ginger powder this year. Mom insisted I keep this powder handy in my kitchen. Little did I realise there were so many benefits which are packed in this aromatic powder. I am sure you would be thinking that if fresh Ginger root can be used why bother to use Ginger powder. The biggest advantage of Ginger powder is that you can control the portions and the effect is many times stronger than that of fresh Ginger root. Ginger powder is known as Sonthi Pitti in Konkani. Its also known as Sonth Pudi and is a yellow, rough powder with strong aroma. As a kid, Mom gave me tiny portions of this mixed with honey to keep cold and cough away.

I am listing few health benefits of Ginger powder in daily diet:
- Ginger powder can be added in beverages like Tea or Coffee to improve metabolism and aid digestion.
- Ginger keeps bloating, nausea, indigestion at bay and strengths your immune system.
- The oils in Ginger are very strong and if taken regularly aid in combating Arthritis.
- Ginger being a stomach friendly herb, packs lot of benefits to keep toxic elements, worms and harmful bacteria away.

Kitchen use of Ginger powder:
- Ginger powder can be easily added in soups, stews, breads, cookies and pies.
- They are also widely used in Asian, Thai cuisines to make hot piping stews with vegetables and meat.
- Ginger powder can be mixed with honey to soothe sore throat, cough and cold.
- Mix Ginger powder (about 1/3 teaspoon) wit Tea to cure chills, cold and flu symptoms. Ginger has this uncanny ability to elevate body temperature thereby making you feel warm.
- Make Kashaya - a soothing herbal drink with 1/3 teaspoon Ginger powder, 1/3 teaspoon Pepper powder, 1/2 teaspoon Jaggery, 2-3 straws of Lemon Grass and bring to boil. Mix in 1/2 cup of milk and 1/2 cup of hot water and gulp it down in one shot. I will be posting a detailed recipe on this soon.


This is a work-in-progress post. I would be updating it regularly as and when I get more info around this wonderful spice powder.

Wednesday, October 13, 2010

Empire Ghee Rice

Bangalore - A workaholic city bustling with IT professionals offers myriad choices for Foodie's around the globe. Be it gourmet & fine dining options or the simple to humble inexpensive Tiffin items, there is something for everyone in this city with great affordable choices & tasty options to suit your palate and pocket. In Bangalore, if one visits Hotel Empire they have a special menu which is most sought after by me and my friends. It was a combination of Veg/ Chicken Kebabs, Ghee Rice served with Salad on the side and Veg/ Chicken Gravy. Over a period of time, this became so famous amongst my friends that every time we went there, we knew what we wanted to order. The flavour has left an indelible mark on my memory. This ubiquitous combination is quite enjoyed by some of my dearest friends in Bangalore.

I usually use the cooked rice from previous day for a good fluffy textured Ghee Rice. Its important to thaw the rice at room temperature before use. The cooked rice has to be dry with less moisture. The more grainy and separated the rice is, the better your Ghee Rice. I added Cashew Nuts to spruce up the flavour. My husband is a big fan of Ghee Rice and he enjoys this with Chicken curry with thick gravy or Fried Chicken. Its an occasional treat for us owing to the high calories involved. The recipe is quite simple and is an effort to recreate the same long forgotten flavour.

~ Empire Ghee Rice ~

Preparation time: 5 minutes
Cooking time: 15 minutes

Ingredients:
Rice (cooked) - 4 cups
Onion (sliced) - 3/4 cup
Cashew Nuts - 1/2 cup
Ghee
Salt

Method:
Thaw the rice at room temperature at least 1/2 before use. Use a large faced deep sauce pan, that way your rice gets evenly warmed. First heat a huge quantity of Ghee, allow to melt and saute the cashew nuts. Let them turn golden brown with a nutty aroma. Remove from heat and keep them aside. Next saute the sliced onions and saute them till they turn crunchy and golden brown. The texture should be like deep fried onions. This whole process takes around 10 minutes. After the onions are fried completely, transfer them to a paper towel and keep aside. Now, add the cooked rice in ghee, give a good stir, much better if you can shake up the rice without using a spatula or ladle. The intention is to get the ghee coated and not to break the rice. Adjust salt now. Once rice is fluffy, turn off flame. Garnish with fried onions and cashew nuts. Serve warm with a gravy of choice.

Note - For best results, use good quality Ghee or Unsalted Butter. Fried Onions render a good layering to the dish. Ensure they are completely fried to get a good bite of crunch. Do not add too much salt as your complementary dish would have sufficient salt.

Tuesday, October 12, 2010

Butternut Squash Soup


Butternut Squash is an uncommon vegetable making a bold scene during the Fall season. I love the silky, butter like flavour of the vegetable and enjoy adding it for Stews and Soups. I discovered on recent Food shows on TV that Nutmeg is a great spice to go along with any Butternut Squash preparations. Chopping the skin of this vegetable can be a hard task, best way to tackle that is half the squash, drizzle some oil and bake in the oven for 30 minutes. Allow to cool and scoop out the cooked portion from the skin for cooking purpose. A warm pot of simmering soup on a hot stove for a quiet chilly evening certainly wows the child in me. To neutralise the taste of sweet Butternut, I added Soup cubes and Red Onions with a free hand of mixed herbs (Thyme, Rosemary and Chives) and a dash of Nutmeg as well. I did not add salt at all. Unlike other soups, this one was not brothy at all; instead I chose to make it very pasty and thick.

Soups are also a great way to build appetite, rev up your metabolism with less calories, camouflage the unfavored vegetables in the family (especially for kids!) and are a potent source of nourishment.

Preparation time: 15 minutes
Cooking time: 10 minutes

Ingredients:
Butternut Squash (boiled and mashed) - 2 cups
Vegetable Stock - 1 cup or Water - 1 cup
Nutmeg (grated) - 1/3 teaspoon
Milk - 2-4 tablespoon
Soup Seasoning Cubes - 1
Onion (chopped) - 2 tablespoon
Oil/Ghee

For Garnish - Mint leaves & Mixed herbs [Thyme, Rosemary & Parsley]

Method:
Peel the hard skin of the Butternut. Dice the vegetable chunks. Pressure cook for 4-5 whistles. Allow to cool. Mash and keep aside. In a deep saucepan, heat Oil, saute the chopped Onions till they wilt and charr a bit. Add the mashed puree of vegetable & milk. Give a gentle stir and add vegetable stock. Add water if you don't have vegetable stock handy. Add soup seasoning and mix well. Do not add any salt as the Soup cubes have enough Sodium to hold and bring the flavours together. Bring to a boil and simmer for 2 minutes. Garnish with grated Nutmeg, Mint and mixed herbs.

Wednesday, October 6, 2010

Spicy Lentil Soup (Pappu Chaaru)

Occasionally, we get lunch and dinner invitations which are seldom easy to forget. I mean, its not about the FOOD always! Its about the people, their hospitality, warmth, finally the company which is what matters the most. They'll cook and present the most simple dishes you can find on the face of earth; yet you feel the love all around. This also compels me to think that any simple dish cooked with love is far more tasty than a banquet dished out in a grumpy mood. I recall this amazing lunch we had at one of our office friend's place in India.

My friend makes the most amazing Chekkalu, Pacchadi, Pappu, Poriyal's and Biryani's. She made this simple spicy lentil soup which is popularly known as Pappu Chaaru in Andhra Pradesh state of India and is a quite a staple recipe in many a Andhra homes. A very simple soupy textured broth with a healthy seasoning of garlic and augmented with lot of tangy flavour of Tamarind juice. This broth is neither too thin nor too thick. Some versions of Chaaru are also made with vegetables of choice primarily Okra, Baby Onions, Tomatoes, etc; I prefer this simple plain one for the simplicity. I was in love with the Chaaru flavour and asked her for the recipe. The compliments surely made her day! I have made this countless times and love the taste. Every time I slurp the soup, it reminds me of the wonderful time we had at her place.

Preparation time: 15 minutes
Cooking time: 15 minutes

Ingredients:
Toor Dal (cooked) - 1/2 cup
Turmeric powder - 1/2 teaspoon
Red Chilli powder - 1/2 teaspoon
Tamarind extract broth (concentrated) - 1/3 cup
Jaggery or Sugar - 1 teaspoon

For Seasoning -

Red Chillies (Byadgi) - 2-3
Garlic - 3-4 pods
Oil/Ghee
Mustard seeds - 1/2 teaspoon
Curry leaves - 3-4
Garnish: Chopped Coriander leaves and hot melted Ghee.

Method:
Pressure cook Toor Dal and keep aside. In a vessel, cook the boiled Toor Dal with water in 1/2: 4 proportion. Which means, for half cup of cooked Toor Dal, add 4 cups of water. Dilute the Dal entirely in water and bring to boil. Add Turmeric powder and Red Chilli powder. Soak Tamarind pulp in warm water for 10 minutes. Squish it with your hands and add the juice in the cooking broth. Add Jaggery or Sugar now. Give a gentle stir. Adjust salt and water consistency as per choice. The broth will be brown in color now. Bring to boil and simmer on low flame for 10 minutes and turn off the flame.
In a separate pan, heat few spoons of oil/ghee. Add mustard seeds and once they begin to pop, add curry leaves and crushed Garlic. Let the garlic brown and char a little. Pour this piping hot seasoning over the Chaaru. Cover and close with a lid. Garnish with chopped Coriander leaves if desired. Mix while serving and enjoy with hot steam cooked white rice. Top it up with some hot Tuppa or Ghee.

Tuesday, October 5, 2010

Steamed Rice & Spinach Spicy Balls (Palak Piyava Mudde/ Spinach Onion Mudde)

The cold spells and chilly weather makes me yearn for warm home cooked food all the time. Couple of days back, I made this traditional style of eating spicy rice and vegetable balls called as Mudde or Muddo in Konkani. It is cooked batter, usually mixed with vegetables of choice. We make different versions of Mudde at home. Essentially, Mudde is a lump or dumpling of batter cooked with or without vegetables of choice. In olden days, during my Grandmom's era, they were shaped as balls and steam cooked just on its own. Later, Idli moulds came into the picture, my aunts also steam them in Banana leaf & Jackfruit leaf containers. I prefer cooking them in Idli stand with indendations; that way the quantity is just right for a bite!

Mix the basic batter with vegetables of choice - Cabbage, Onion, Taro Leaves, Cassia Tora leaves (Taikilo), steam them and serve with warm coconut oil. Don't skip this step else you will miss the flavour. For best flavour, devour them when they are piping hot. The Mudde is very healthy since it is steam cooked. It blends well as a side dish for many a Konkani curries and daals. The blend & balance of coconut and rice is key; if you add more coconut, the steamy cakes fall apart, less coconut they turn hard and unedible. My Grandmom makes the best Onion and Cabbage Mudde. You could use Idli Steamer stand (with indentations) or Idli steel moulds which you get at Indian or Ethnic stores to steam cook the little goodies.

Preparation time: 10 minutes
Cooking time: 20-25 minutes
Yield: 10-12


Ingredients:
Batter -
Rice (Sona Masoori variety) - 1 cup
Coconut (grated - fresh or frozen) - 1 cup
Red Chillies - 5-7

Tamarind - small lump
Asafoetida - Just a pinch
Salt
Pure Coconut oil

Vegetables (chopped) - 3 cups
[Any of these - Onion, Spinach, Cabbage, Taro leaves, Cassia Tora leaves]

Contraption - Idli Steamer and Idli Stand or Idli moulds

Method:
Wash vegetables, chop them and keep aside. Wash rice in multiple rounds of water till clear and soak for 2-4 hours. Drain rice and keep aside. Heat few spoons of oil and roast the red chillies for couple of minutes. Allow to cool. Grind to a coarse paste with rice and red chillies. Add salt and Asafoetida. The paste should be very coarse so rice should break into 2-4 pieces for better flavoured Mudde. Add less or no water and make a coarse paste. Mix in the chopped vegetables in the paste. Pour scoops of this paste on each of the Idli stands indentation and steam cook for 20-25 minutes. Serve hot with a garnish of coconut oil. Serve as a side dish along with Paej/ Kanji/ Soupy Brown Rice.